Saturday, March 14, 2020

Is That What That's Called....

Last week a co-worker was asking around the office about a strange kanji.  Given his extensive knowledge of kanji, it's not too often that he's stumped by an unusual character.  One other co-worker didn't have a clue but a student who had just arrived for his class was able to explain right away.  The character in question wasn't a character.  It was a symbol.


The culprit in question was the blue symbol above the backhoe pictured on the side of the vending machine.  The name given to such a symbol is "yagou", 屋号.  Typically they are easy to distinguish from kanji but this one was close enough to resemble a kanji character.

-*-

 Following the 1/700 B-Resina HMS Suffolk is a 1/700 representation of the Aiyo Maru.  I say "representation" in this case because the kit doesn't bear too much resemblance to a respectable rendering of a model ship.  A poor quality casting coupled with inaccurate details and a questionable design choice of casting the hull in three pieces results in a sight for sore eyes.  The manufacturer has been casting hulls in sections for over twelve years though their initial offerings from about twenty to twenty-five years ago had hulls cast as single pieces.  I suspect that option was chosen to avoid the problem of warped or hogged hulls.  But other manufacturers have managed to find a solution to the problem without resorting to this odd ball technique of splitting the hull into short sections.

A few years ago a reviewer on a model ship forum described a ship kit made by this manufacturer as a bar of soap.  Some wag quickly chirped that if the kit was a bar of soap then at least it would be useful....


Friday, February 14, 2020

At Least It's Finished

A quick rundown on the steps taken to complete my build of the 1/700 scale kit of HMS Suffolk.

-*-

Having scalped off the ships' funnels, I went about making replacements.  The replacements were made from parts taken from an under scale kit of HMS Dorsetshire.  The seats for those funnels were molded directly onto the deck part of that kit.  So I went and made my own....


I attached the piping on the sides of the funnels and built a part on the forward most funnel which was to represent the ship's whistle platform.


Following that, I scrounged up replacement parts from kits of HMS Cornwall and HMS Kent with which to build the ship's main armament.  The barrels required a small bit of surgery to get them to fit properly in the turret housings.  Here the turrets are placed on board in a "dry fit" test.  After they were painted they were glued on.


The last steps were to assemble and paint the cranes; mount the anti-aircraft guns, assemble the secondary armament and attach it; and to paint and attach the ship's launches and cutters.

At which point I arrived at my finished product:


This wasn't a speedy build by any stretch but it was reasonably satisfying.  I scratch built a few replacement parts which turned out okay.  They're certainly not top notch quality but they're sufficient to get me to the point where I can say that the kit has some degree of semblance to the real thing.  Painting the camouflage was the fun part and the results aren't too shoddy.

Off to my next project....

Sunday, January 12, 2020

At The End of The Day...

...I need to do something about the whole pile of model kits I've acquired from a couple of years of trolling online shops and auction sites.   In the last half of 2019 a lot of purchases had the characteristic of being "Oh, heck...why not?" type of acquisitions.  Sometimes the decisions left me wondering what in the world I was thinking of when I clicked on the "buy" or "bid" buttons.  One of them was the 1/700 scale model kit of HMS Suffolk which was produced by a company called B-Resina.

First of all, why did I bid on the kit?  Probably because it represents Suffolk which was a County class cruiser that sported a cut down quarterdeck.  This modification was done to only two members of the class of ships.  I have collected all four of the County class cruiser kits released by Aoshima over the past year and half or so, not to mention a re-scaled version of HMS Dorsetshire...oh, and a pre-war version of HMS Dorsetshire.  Okay, that's five kits in that stash.

The B-Resina kit of HMS Suffolk has been around for some time.  I'm not sure for how long.  A review of the kit written at the time of its release surmises that it's a scaled down version of Airfix's 1/600 scale model of the ship.  Interestingly enough, the B-Resina kit is pretty well a perfect copy of the bigger model, and it copies the idiosyncrasies of the big brother.  If you want to know what those are then I recommend digging up a review which I came across on Steelnavy.com....I think.

So, having purchased the kit, and looking at the stash of RN County class cruisers I had built up, I decided to start building it right away.  That doesn't mean it'll be built in a hurry but at least it'll end up spending some time on my work table as an in progress project.

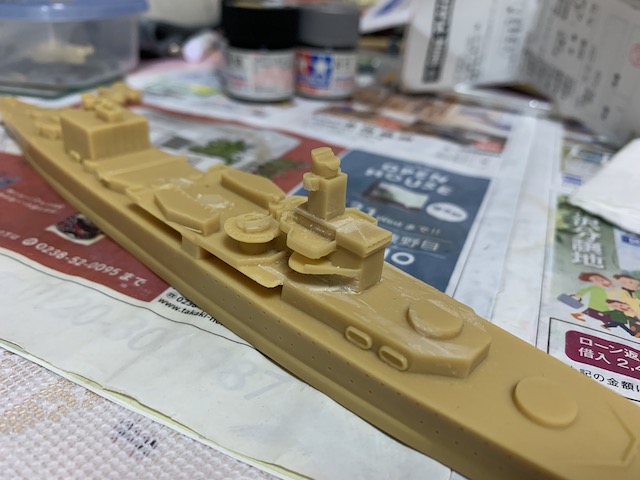
First step in the project was to chop off the hunks of resin plastic which didn't belong.  That involved cutting out the solid mass under the lower bridge wings.  Then I decided I didn't like the look of the bridge tower.  So off came the deck at its base.  Next, I went out and bought some chisel style "Exacto" knife blades and removed the funnels.  They are too close together and leaning too far back according to kit review.  I tried to removed the gun crew and ammo shelters next.  That didn't happen as they are securely molded onto the deck.  My attempt to remove one resulted in a piece of the deck flying off.  I did manage to find it and reattach it.


Having cut off a lot of the ship, I then went about adding parts back on.  I didn't like the shape or location of the forward section of the bridge.  But it's solidly molded onto the ship and rebuilding it would take more effort than I wanted to put in given the nature of the project.  So I settled with adding a piece of plastic card on top of it.  The deck at the base of the bridge tower was shaped from plastic card and the original kit bulwark, albeit a bit shorter thanks to the razor saw cut made to remove it, was reattached.


The net result wasn't pretty but it was good enough...for the time being.  Having completed those steps, I prepped the kit for a coat of primer.  But first I marked off on the deck where the funnels were going to go.  Taking this step means I don't have to scrape primer off the ship when attaching the funnels.  The original kit didn't have what I suspect were two ventilator housings between the funnels.  I scrounged up parts for them from some other kits.  The locations of the housings and the funnels were taken from a 1/700 scale kit of HMS Kent.


 The height of the bulwark around the deck at the base of bridge tower started to annoy me.  So I went about cutting strips of thin plastic card, shaping them, and then attaching them.  The net result looked a lot rougher than desired even after puttying and sanding.  A second run at that process came up with the result shown below.  Not great but when I held the ship at arms length, not too noticeable.  I may take a third run at it yet.

Having done that, I attached the masts and then gave the kit a coat of primer:


At this point in time I've started painting the ship's camouflage.  In the past, when dealing with camouflage patterns that involve wavy or curvy shapes, I've resorted to hand painting.  With a pattern that has straight lined blocks then masking is employed.  For this project I went about making a do-it-yourself masking sheet.  I found a drawing of the ship online, scaled up the drawing to 1/700 scale, printed it on a sheet of paper, put the printed paper image into a clear folder, and applied masking tape over top.  The Tamiya brand masking tape is thin enough such that I could make out the pattern underneath.  After drawing the shape onto the tape and removing the unwanted parts with a knife, I had myself a primitive masking sheet for the hull of the ship.
 

Of course, the hilarious part of this is that there isn't much contrast between the first two colours applied to the model.  Hopefully it will be more noticeable when looked at under natural lighting instead of fluorescent lighting.
 

Friday, August 16, 2019

There's a First Time for Everything

In my previous post I described my efforts to replace the shoji paper on the slides in my Japanese style room.  Here are the final results:


The two slides on the left have ironed on shoji paper.  The two slides on the right have glued on shoji paper.  It may not be possible to see in the photo but the shoji paper on the left hand slides isn't quite flat.  I've tried to get them to go taut by misting them with water but that wasn't enough to do the trick.  Oh well...fix it up next year I suppose.

I showed the above photo to an acquaintance and she thought I had done very well.  "When I do it there are bumps all over the place" she said.  Okay.  But I still think I have a bit of room for improvement.  Though with the tools I have this may be as good as it gets....

Here's a work in progress shot of the centre right slide:


Wednesday, August 14, 2019

Time Goes By....

I obviously am not doing very well on my intention of posting a blog entry at least once a month.  It's the middle of Obon and the middle of August and this is my third post this year.

My initial title for this entry was "Time Flies..." but I decided against that.  I just finished giving a sparrow a burial.  It was lying dead at the end of hallway that runs past the doors of all the apartments on my floor.  It either succumbed to a fatal injury incurred from flying into a window, the passageway is lined with windows, or the heat wave we've been experiencing the past few weeks.  The property my apartment stands on doesn't have a square centimeter of open soil.  So I discreetly dug a hole in the patch of weeds behind the neighbouring newspaper distribution office, placed the bird corpse in the hole, and covered it up.

-*-

Today I went about replacing the torn shoji paper of the sliding partitions of my Japanese style room.  I chose the type of shoji paper which you can secure by heating it with an iron.  After completing two sliding partitions I've realized that 1) the stuff doesn't necessarily stick very well on the wooden frames, and 2) it's not an easy task getting it to lie completely flat.  Getting it taut like the paper I'm replacing appears to be beyond my abilities.  Given that, I will head back to the hardware store to purchase some shoji paste.  I'll use it to secure the loose edges where the heat treatment was enough to get the paper to stick to the frame.  All in all, the paper I've laid down looks pretty bad but, on the plus side, it doesn't have any holes or torn panels...yet.

Saturday, June 15, 2019

Start of a New Era...A Very Brief Update

Yeah, it's upside down.  It's just that when 
posted this way Menhera-chan is pointing 
in the correct direction to indicate the 
end of the Heisei era posts and the start 
of the Reiwa era posts in this blog.

So the Heisei era has ended and we're now in Reiwa.  At least one person I know asked out loud why Japan hasn't switched to counting the years using the Western method but I figured that the idea wouldn't fly to well in certain circles in this county. 

Aside from a few people saying "Ake ome", which is normally reserved for use at New Year's, there wasn't too much of a big fuss about the event in these parts.  The post office threw me for a loop when they started putting entries such as 01/05/03 in my bank passbook...okay, what year was that?  My next car inspection expiration decal will sport a big "03" instead of "33".  The list goes on....

Monday, April 15, 2019

Game Log #2 - Lost in Evoland...2!

Last December I obtained a new iPhone.  I said "obtained" because I'm going to be paying for it in installments for 4 years(!).  Similar to when I got my iPhone 6, I went hunting for a few new games to grace my new piece of hardware.

What I stumbled upon was a little gem called Evoland.  It's a short little game in which player works their way through a kind of history lesson of computer games.  The player starts off which graphics and music typical to the 8-bit gaming era and ends up in a 3D style game environment circa mid 2010s.  The game was amusing on account of its self-effacing commentary and variety of game play styles.

"You got a star".  Okay.  What's next? ;-)


As it turns out, that game spawned a successor... creatively named Evoland 2.  Unlike the games which I spent a fair bit of time playing on my previous iPhone, this one has turned out to be somewhat addictive...or perhaps not.  It's the part of me which says "How about trying this?" which has led me to spend a rather large amount of time focused on the game.  Proof of that is nonsense like this...

That 333 equals 333 bouts in a fighting tournament...yes, you can roll your eyeballs.

The purpose of that nonsense?  To get to level 50 of course... >.<

-*-

A while ago I was using a news article related to the topic of Brexit in a lesson.  The focus of the article was an EU statement where Gibraltar was described as a British colony.  The UK government took offense to that and was quick to issue counter statement.  One of my students was a bit puzzled about the word "colony".  I was about to explain its meaning when another student offered up its Japanese equivalent.  The first student still looked a bit confused.  Then he had his "Eureka!" moment.  The problem wasn't with the meaning of the word.  It was the context.  He only knew the word from its context in the Gundam anime universe.  Ah, hah....  No, Gibraltar is not a space colony.

 -*-

I have a kids class where three girls have now entered junior high school.  The other member of the class is a boy in 5th grade.  When I asked the class if they had gone anywhere during spring break, one girl quickly replied "Okinawa!".  So my next question was "Where did you go?".  Her reply was "A hotel!".  Ah, yes.  Of course.  So I asked what other places she went to.  "Suizoku-kan" was the reply.  "What's that in English?", I asked.  She was stumped but that was okay since I was sure it hadn't popped up in their textbook yet.  The girl sitting next to me quietly said "Aquarium".  Okay.  Next question.  "What did you see?".  Answer..."Fish!".  Ah, the first year of junior high school.  They're not kids but they sure as heck aren't teenagers.

 -*-

Yes, this photo was taken in April.  Not as much snow the previous week, but it's still snow in April....